A hockey skate blade can sever a tendon in under a second. Yet most players hit the ice wearing nothing but a thin compression shirt under their gear.For teams and clubs sourcing protective wear in bulk, partnering with reliable OEM/ODM cut-resistant base layer manufacturers ensures players get consistent, high-quality protection across every piece of gear.
You're searching for the best cut-resistant base layer for hockey players. That tells me you already know "good enough" protection falls short.
Here's what this guide covers:
The real science behind HPPE and Kevlar fabrics
A hands-on breakdown of the top five brands on the market
A clear buying framework to match the right slash-resistant hockey gear to your game, your body, and your budget
No second-guessing label claims. Just straight answers.
5 Critical Factors to Choose the Best Cut-Resistant Hockey Base Layer
Not all cut-resistant gear is equal. The gap between a product that truly protects you and one that just looks protective can be measured in tendons.
Here are the five factors worth checking before you buy.
1. Verified Cut-Resistance Rating (Not Just Marketing Language)
This is where most shoppers go wrong. A label that reads "cut resistant" or "Kevlar reinforced" without a specific grade number tells you almost nothing.
The rating you need is ANSI/ISEA 105 A8 or A9 . These grades are built for high-risk environments where a fast, sharp blade is the threat. Here's how the scale breaks down:
A1–A3 : Standard textile territory. Little more protection than a cotton tee.
A4–A6 : Light industrial use. Slows a blade. Doesn't stop one.
A8–A9 : This is where real hockey protection starts.
Look for the full standard number — something like "ANSI/ISEA 105-2016 A9" — not vague marketing claims. Solid brands back their ratings with third-party test reports from labs like Intertek or SGS. These documents list the real cut-load values. An A9 rating corresponds to >6,000g cut resistance . No data? That's a red flag.
Two quick material rules worth knowing: Kevlar alone is about 5× stronger than steel by weight. Dyneema (UHMWPE) hits 15×. Fabrics blending ≥50% of these fibers at high density often reach A6–A9. But certified grades always beat material claims alone. Don' T accept one without the other.
2. Coverage That Stays Put
Three zones take the most risk — ranked by how often a skate blade reaches them:
Neck (carotid and jugular arteries)
Wrists and lower forearms (the gap between glove and sleeve)
Ankles and lower calves (the gap between sock and shin guard)
A collar that covers only the front of the throat is a design flaw. Look for integrated neck guard base layers with a collar height of at least 4–5cm. It needs to wrap around both sides of the neck. Separate neck guards shift during play. Built-in designs shift far less.
For sleeves, the cuff should reach at least 3–5cm beneath your glove's wrist guard. A reinforced wrist panel is better than just extra fabric thickness.
Anti-slip construction details to check:
4-way stretch with 10–20% spandex — the fabric moves with your shoulder rotation and elbow flexion instead of riding up
Flatlock stitching at high-movement zones (shoulders, underarms, elbows) — this stops gear edges from catching the fabric and dragging it out of place
Silicone grip strips at the hem — small detail, real difference over a full game
3. Moisture Management and Breathability
Cut protection is the headline. But comfort decides whether a player wears the gear at all.
The most practical fabric setup: 80–90% polyester or nylon + 10–20% spandex , co-woven with the cut-resistant fibers. This blend wicks sweat fast without losing the structural density that protection needs.
Playing in a cold rink? Hate synthetics against your skin? A merino wool blend (20–40%) adds solid temperature regulation and odor resistance. That's useful for evening beer league sessions in 5–8°C arenas.
One structural feature worth seeking: mapped mesh panels at the underarms, mid-back, and chest sides. These zones run 20–40 g/m² lighter than the main fabric. They release heat and moisture without touching the protected areas.
For younger players and goalies: go with light-to-medium compression , not maximum compression. Heavy compression raises heat load. On a teenager, that often means the gear gets ditched after two practices — and then it's not protecting anyone.
4. Age Group and Use-Case Fit
A base layer right for a 10-year-old house league player is a different product from the right choice for a 35-year-old rec league defenseman.
Youth players (U8–U18): USA Hockey mandates or strongly recommends neck protection across various age levels. Beyond compliance, look for front-zip or half-open chest designs. These make dressing room chaos on game day much easier to manage. Flatlock seams and tagless construction matter too. Itchy or uncomfortable gear doesn' t get worn.
Adult recreational players: Rules at this level are often advisory, not mandatory. But the risk is identical to competitive play. An A6–A9 rated shirt plus cut-resistant socks , covering at least the neck and ankles, is a solid baseline. Breathability matters more than maximum compression at this level.
Competitive and goalie players: Skate contact is frequent. The stakes are higher. Full-coverage, highest-grade protection across all three critical zones isn't an upgrade here. It's the baseline.
5. Fit Precision Across Body Type and Position
A base layer that bunches under shoulder pads or gaps at the wrist mid-stride isn't doing its job. Certification rating doesn't matter if the fit fails.
The practical test: Gear up completely, then run four movements — full HEAD rotation, both arms overhead, a hard shooting motion, and a sharp stop-and-turn. Have someone watch for:
Any neck collar flipping down or riding up
Skin showing at the wrist gap
Fabric pulling away from the mid-back or side neck
For body type: Slim/compression cuts stay in place better during active movement. Straight-cut fits give more room but need stronger anti-slip construction — look for silicone hem strips to compensate.
For position: Goalies do better with roomier cuts in the hips and shoulders. Forwards and defensemen perform better in fitted or semi-compression versions. Loose fabric bunches under tight protective shells and shifts coverage out of place.
The right fit isn't about aesthetics. It's about making sure the protected areas are still covering the right anatomy once the game speeds up.
Titan BattleGear Cut-Resistant Base Layer 2.0 — A9 Protection Reviewed
Most cut-resistant hockey shirts on the market protect your neck at ANSI A3. The Titan BattleGear 2 . 0 does it at A9 — the highest tier on the entire ANSI/ISEA 105 scale. That gap isn't a minor spec upgrade. It's the difference between a garment that slows a blade and one that stops it cold.
What the Protection Really Looks Like
The collar runs Titan's proprietary Titanotex™ fabric, rated at ANSI A9. That's six times the cut-resistance you get from a Bauer pro cut-resistant shirt, which tops out at A3 at the collar. The wrist and forearm zones come in at ANSI A7, built through a triple-layer construction: outer jersey fabric, a Titanotex layer, and an internal stabilizing layer that runs from glove cuff to elbow pad. No gaps. No separate wrist guard needed.
The neck design runs Titan's ArcGuard™ / Stretch ProCurve™ contoured collar. It traces the carotid artery and jugular vein path along the front and both sides of the neck. Coverage holds through full head rotation. That's a bigger deal than most players expect — traditional flat neck guards twist and ride up the second you turn hard into a board battle.
The Fabric and Fit
The main body is 87% polyester / 13% Lycra at 4.16 oz/yd². Lighter mesh panels on the back and underarms (90% polyester / 10% Lycra, ~3.24 oz/yd²) push heat out fast. The overall feel is closer to a premium cycling jersey than a padded base layer. Reviewers call it lightweight and genuinely comfortable — even at the triple-layer wrist zones.
The cut is tapered athletic, not compression-tight . The sleeves are shaped to sit flat under shoulder and elbow pads without bunching. You get 11 size options, from Youth XS (around age 4) up to Senior 3XL . The collar comes in velcro and non-velcro versions, so you choose how much adjustability you want on the bench.
Who Should Prioritize This Shirt
The BattleGear 2.0 is built for players where skate contact is a real risk, not a remote one. That means:
Competitive youth U10–U18
Defensemen and goalies
Junior and collegiate players
These are the players dealing with crowded crease traffic and board battles at full speed. Parents who've seen a close call in their rink community — and want more than the bare minimum — will find this shirt worth the look too.
For recreational adult leagues or house-league players at a moderate pace, a separate A3–A5 neck guard plus basic cut-resistant wrist sleeves runs $85–$130 combined . That's a reasonable budget option. The BattleGear 2.0 retails at $120–$170 , which puts it at a 30–70% premium over those partial-protection setups. The premium is backed by a real jump in protection: A9 vs. A3 at the collar, integrated A7 wrist coverage, and hockey players team base layer customization — 10 stock colors, plus full logo and number programs for orders in the 15–25 unit range.
Bottom line: you play at a level where a skate blade near your wrist is a genuine risk. This shirt takes the guesswork out of the equation.
Warroad TILO Neck & Wrist Base Layer — Dyneema Cutlon Fabric Performance
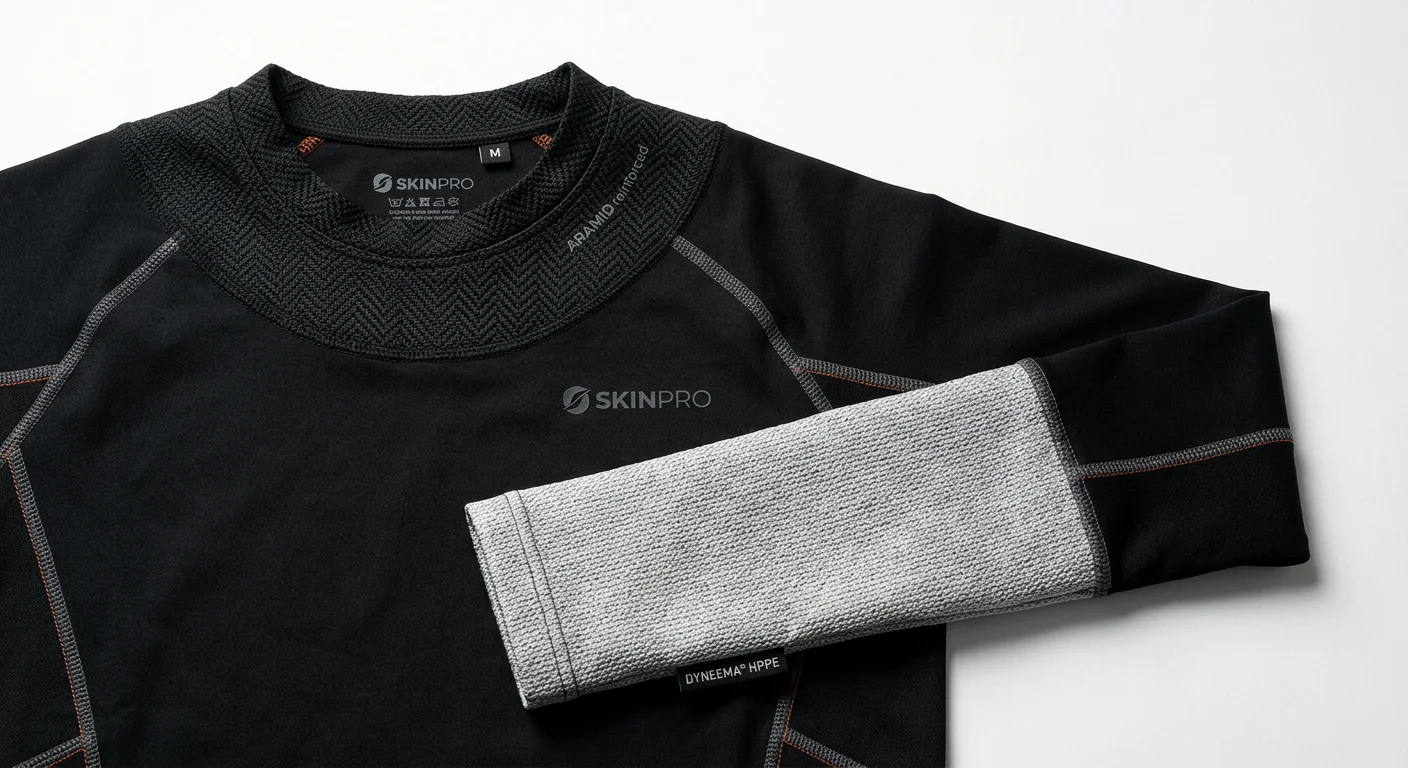
Warroad didn't build the TILO by picking one cut-resistant fiber and calling it done. They made a clear material split — Dyneema at the wrists, Kevlar at the neck. That choice matters, and it's worth understanding before you decide if this shirt belongs in your bag.
Two Materials, Two Zones, One Logic
The wrist and forearm panels use Cutlon® fabric: 93% Dyneema® (UHMWPE) / 7% Lycra . Dyneema is an ultra-high-molecular-weight polyethylene fiber. Its density sits at 0.97 g/cm³ — lighter than water, and well below Kevlar at 1.44 g/cm³. In a hockey shirt, that gap is noticeable. The Cutlon zones are thin and flexible. They don't stiffen your wrist during stickhandling. They don't bunch under glove cuffs. They sit flat and low-profile, rated at ANSI Level A6 — which covers 2,000–2,499g of cut load .
The neck collar takes a different path. Warroad uses Kevlar plus a high-impact foam layer . That combination pushes the collar to ANSI Level A7 (2,500–2,999g) and earns it a BNQ certification — the Canadian standard that leagues require for approved neck guards. Kevlar handles heat and friction from blade impacts more consistently than UHMWPE. That's a key reason it stays the standard fiber for certified hockey neck protection.
The result of this hybrid design: A7 where severity matters most, A6 where mobility matters most .
Coverage That Stays There
The Cutlon panels wrap the full wrist circumference — 360° — and extend 6–8cm up the forearm . That's enough overlap to sit flush under most senior glove cuffs, matching standard protective coverage benchmarks. The neck collar covers front, back, and both sides. It drops down over the clavicle to close the gap with your shoulder pads.
The fit design makes this work on the ice:
1.Compression-cut sleeves lock the Cutlon panels against the wrist
2.Relaxed-cut body allows air flow and temperature regulation
3.Flatlock seams reduce friction and bulk under gear
4.Silicone grip zones at the elbow pad stop pad migration — a small detail that keeps your coverage in place during hard play
The Fabric Beyond the Protection
The main body fabric — 85% polyester / 8% spandex / 7% Ionic+ polyester — handles moisture management. That 7% Ionic+ stands out. It's 99.9% pure silver fiber, woven straight into the yarn. It suppresses bacteria, fungi, and odor at the source — not after the fact. For a base layer worn against skin through two-hour practices, that's a real hygiene benefit. Not marketing copy.
Honest Context on the ANSI Numbers
A6 at the wrist and A7 at the neck put the TILO well above most hockey-specific cut-resistant apparel . Most competing options land at A3–A5. The TILO doesn't reach the A9 of Titan's BattleGear 2.0 at the collar. But it combines strong cut ratings with BNQ certification — and BNQ is the stamp many league compliance officers check first. For players whose league requires certified neck protection, that BNQ mark is the detail that decides compliance.
CCM Cut-Resistant Base Layer Line — What A3 & A6 Gets You
CCM built their cut-resistant base layer line around a clear, honest split. A3 covers the vast majority of players. A6 is for those stepping into elite territory. Knowing what each rating delivers — not just what the marketing says — makes the choice simple.
A3: What You're Getting
The CCM A3 shirts (including the NP130 and the men's and women's Neck & Wrist Guard versions) carry BNQ and CE certification at the neck. That certification matters more than the number for most leagues. USA Hockey's neck protection mandate checks for a BNQ label first. The CCM A3 shirt satisfies that requirement on its own. No separate neck guard needed.
The protection number in plain terms: ANSI A3 ≈ 1,000–1,499g of cut load before fabric failure. That's not cut-proof. It's solid resistance — enough to slow a blade in a low-energy contact situation. It also meets current compliance standards for youth through recreational adult play.
The design is practical. Cut-resistant fabric covers the neck, chest, and wrists. The chest panel closes the collarbone-to-shoulder-pad gap that most shirts miss. That gap matters. The raglan sleeve cut keeps the arms fitted and the torso relaxed. This reduces loose fabric folds, which can concentrate a blade's force during contact.
Best suited for: house league, beer league, and youth recreational players who need certified protection in a shirt they'll wear every single game.
A6: The Jump That Matters for Elite Play
The CCM Pro Cut Resistant A6 shirt uses denser neck and wrist panel construction. It reaches 3,000–3,999g of cut load — that's 2–3× the resistance of the A3 line at the collar. That extra margin is meaningful at higher levels, where puck speed is faster and crease traffic gets more dangerous.
The trade-off is real. A6 protective zones run heavier and a bit stiffer. Breathability takes a small hit. CCM built this shirt for "fast-paced and elite-level gameplay," and that description is accurate. This is the right shirt for AAA youth, Major Junior, NCAA, and pro-level players . It's not the right fit for someone in a Tuesday adult recreational league.
Pricing reflects the tier. A6 runs 20–40% above comparable A3 options.
The CCM Ceiling — and Why It's a Deliberate Choice
CCM stops at A6. They don't chase A7–A9. That's not an oversight — it's a calculated decision to keep base-layer wearability intact. Each extra layer of UHMWPE or aramid fiber makes the collar stiffer, the cuff bulkier, and the whole garment hotter. At some point, a player — a teenager especially — stops wearing it. A9-rated protection sitting in a locker room bag protects nobody.
For most players, the decision is straightforward:
- League requires BNQ certification → A3 is compliant and comfortable
- Elite play, high contact, or higher risk preference → A6 delivers the extra margin
- Heat-sensitive players or youth programs buying in volume → A3 as the default, A6 as an opt-up for defensemen and goalies
CCM's real advantage here isn't just the cut rating. It's trusted brand recognition, consistent sizing from youth to adult 3XL, and visible certification tags. Equipment managers can verify those tags at a bench check — no guesswork required.
Duzter A5 Cut-Resistant System — Best Choice for Youth Hockey Players?
Most cut-resistant gear is built around the injuries people already know about. Duzter built their system around the ones most gear setups miss.
The gap between a traditional neck guard and a hockey glove? Exposed. The femoral artery running through the inner thigh? Almost never covered. The ankle above the skate boot? Standard gear leaves it bare. Duzter's A5 system targets those exact blind spots — neck, forearms, femoral artery, inner thigh, knee, and ankle — and places cut-resistant fabric there. Nothing more, nothing less.
A5: The Right Grade for the Right Player
Duzter rates every panel at ANSI A5 . Their founder is direct about why: "The standard for hockey is A5." All products carry BNQ certification and USA Hockey compliance . That covers both Canadian league requirements and USA Hockey's neck protection mandate — no separate neck guard needed.
For youth players, A5 is the practical sweet spot. It's not a compromise. Younger players generate less blade force than adults. The most common youth hockey injuries — a skate grazing a fallen player, a blade catching an exposed wrist in a scrum — don't need industrial-grade A7–A9 resistance to stop. You need coverage in the right places . That's where Duzter focuses.
Stepping up to A7–A9 adds 10–30% more weight and thickness. The fabric gets stiffer. The garment runs hot. For a twelve-year-old in a two-hour practice, that's a recipe for gear that ends up in the bag by period two.
Non-Kevlar Construction — and Why It Matters to Parents
Duzter uses a non-Kevlar polymer blend , not aramid fiber. That single material choice changes the whole maintenance experience. Kevlar-based cut-resistant shirts need hand washing and air drying. Duzter's fabric goes straight into the washing machine and tumble dryer with the rest of a player's gear. No special steps. No risk of breaking down the fabric.
For families managing three kids and a twice-weekly practice schedule, that's a real difference. Gear that's a hassle to clean is gear that stops getting worn.
What the System Covers
1.Pro Youth Shirt (Armor / Pro Wall): A5 panels at the neck and forearms. This closes the gap between the shoulder pad, chest protector, and glove cuff. The Pro Wall version adds removable padding at the clavicle, shoulder, and abdomen — useful for players who take hard hits in those spots.
2.Pro Youth Compression Pant: A5 panels covering the femoral artery, inner thigh, knee, and ankle — areas standard hockey pants don't reach.
3.Together: Neck → forearm → groin → inner thigh → knee → ankle. You get a near-complete A5 loop around the body's most exposed arteries and tendons.
Sizing runs XXS through XL , so it covers the full youth range. The compression-pant design lines up the protective panels on its own once worn. No straps to adjust. No extra guards to layer on top. Younger players can gear up on their own without any fuss.
The Armor (Youth) shirt retails around $84.99 — that's mid-to-low in the $80–$140 range for comparable A5 youth base layers. The full system cost stays reasonable. Parents buying both pieces won't face sticker shock.
One more thing worth knowing: Duzter is cleared for use in NHL games . For a youth-focused product, that sign-off carries real weight. Not because house-league players face NHL-level contact — but because it proves the fit, flexibility, and protection hold up under the toughest conditions out there.
Sherwood Rekker Cut-Resistant Long Sleeve — Targeted Forearm Protection Approach
Sherwood made a clear design choice with the Rekker: protect the gap, and nothing else.
That gap sits between your glove cuff and the bottom edge of your elbow pad. It's a few centimeters of bare forearm — easy to miss before a game, hard to forget after a blade catches it. The Rekker places thick cut-resistant fiber right there, at the wrists and forearms. The rest of the shirt uses a standard 85% polyester / 15% spandex compression build.
That's not a shortcut. It's a philosophy.
Why Localized Protection Makes Sense Here
Full-body A9 cut-resistant fabric is heavier, hotter, and stiffer. Sherwood puts the cut-resistant fibers at the forearm and wrist — and nowhere else. This keeps the shirt's total weight in the ~180–230g range , well under the 250–300g you'd see with full-coverage A9 base layers. The trunk and upper arms breathe through mesh panels. The cut-resistant zones stay slim enough that they won't get in the way of your glove fit or stick handling.
The construction also does smart work:
- Raglan sleeve design keeps movement natural
- Flatlock seams reduce bulk and friction
- Silicone grip strip at the lower back holds the forearm panels in place
Together, these features keep the protection zone aligned with that exposed gap — not creeping up toward the elbow, not slipping down into the glove.
The Trade-Off Worth Knowing
The product page lists "thick cut-resistant fibers" for the forearm panels, but no published ANSI grade appears anywhere on it. Sherwood's standalone A8 forearm sleeve ($49.99) shows the grade clearly. The long-sleeve version probably falls in the A6–A8 range. But if your league requires documented compliance, that missing label is a real problem.
The shirt also leaves the neck open. Add a certified neck guard if your league requires one.
At $79.99 , the Rekker long sleeve costs far less than full-coverage options ($120–$170). For a recreational or youth player who wants real forearm protection — without the extra weight, heat, or price of a full A9 system — this is a smart, straightforward upgrade.
Cut-Resistant Hockey Base Layer Comparison: Top Picks Side-by-Side
Five brands. Very different approaches to the same problem. Here's what the side-by-side breakdown looks like.
Brand / Model | ANSI Cut Grade | Coverage Zones | Key Fabric Tech | Price (USD) | Best For | Certification |
|---|---|---|---|---|---|---|
Titan BattleGear 2.0 | A9 | Neck, wrists, torso gaps | Titanotex™, ArcGuard™ collar | $127–$159 | Competitive adults, elite juniors | ANSI A9 declared |
Warroad TILO | ~A5–A7 (est.) | Neck 360°, wrists 360°, clavicle | Cutlon® Dyneema®, ionic antimicrobial | $129–$169 | Competitive adults, high-level youth | Brand-stated; no published ANSI report |
CCM A6 Shirt | A6 | Neck + wrists | Synthetic cut fiber, 4-way stretch | $99–$129 | AAA youth, elite adult leagues | Grade declared; lab source unlisted |
CCM A3 Shirt | A3 | Neck + wrists | Same platform, lower fiber density | $79–$99 | Recreational adults, budget-conscious players | Grade declared |
Duzter Pro Wall | A5 (certified) | Neck, arms, clavicle, shoulder, abdomen | Non-Kevlar blend, machine washable | $149–$179 | Youth and adult goalies | A5 certified + NHL cleared |
Sherwood Rekker L/S | ~A3–A5 (est.) | Forearms + wrists only | Thick cut-resistant fiber inserts | $69–$89 | Youth, recreational adults | Brand-stated only; no ANSI label |
Winnwell Neck Guard Base Layer | Unlisted (BNQ on similar models) | Neck, partial shoulder-neck | Integrated neck guard, synthetic blend | $69–$79 | Budget youth, casual recreational | BNQ on similar models; unconfirmed on this version |
Who Should Buy What
Competitive adults (forwards and defensemen): Titan BattleGear 2.0 is the top pick. You get A9 protection at the collar, built-in wrist coverage, and no gaps to worry about. Warroad TILO comes in second. Pick it if you want a thinner, more flexible fit and a published grade number is not a priority for you.
Recreational adults: CCM A3 covers the basics at a fair price. Already have a neck guard? The Sherwood Rekker fills the forearm gap for $69–$89. It adds protection without replacing your existing gear.
Youth players and parents buying for them: Duzter Pro Wall is the practical choice. It's A5 certified, NHL cleared, and machine washable — so it stays in regular use without hassle. CCM A6 is the step up for AAA-level youth who need a stronger protection margin.
The bottom line: grade transparency beats brand reputation. A shirt with a published ANSI number — even A3 — gives you real data to trust. A shirt that claims "high-grade protection" with no numbers to back it up does not.
Buying Guide by Player Type: Which Cut-Resistant Base Layer Fits Your Game
A base layer for a twelve-year-old in house league looks nothing like the right pick for a 22-year-old playing Junior A. Same sport, same blades — very different risk profiles, budgets, and gear setups.
Here's how to match protection to player.
Elite and Competitive Players (AAA Youth, Junior, College, Adult Competitive)
You need A8–A9 rated coverage at the neck, wrists, and ankles. These are the three zones where blade contact is most common and most dangerous. Look for an integrated collar with 360° wrap and at least 5–7cm height. Wrist panels should overlap your glove cuff by 2–3cm even with your arm stretched out. The waist hem needs to stay put mid-shift — no riding up.
What to prioritize:
1. A published ANSI grade number — not just "cut-resistant" marketing language
2. BNQ certification at the neck for league compliance
3. Compression fit to keep panels from shifting under shoulder pads and elbow guards
4. Full-system layering if your league intensity calls for it: shirt, pants, and socks all at A8–A9
Before you buy, put on all your gear and run three checks. Does the collar hold position when you turn your head hard? Can you see any skin at the wrist gap? Does the hem stay down after a sharp stop?
Youth Players (Parents Buying for U8–U18)
USA Hockey mandates neck protection for players under 18. That rule narrows your search fast: BNQ certification at the collar is non-negotiable . Start there, then build outward.
A practical buying sequence: 1. First: A BNQ-certified integrated base layer with A5–A7 neck and forearm coverage 2. Second: Cut-resistant socks at A5 — the ankle and Achilles are serious injury zones that most parents miss 3. Third (if budget allows): Cut-resistant pants or compression shorts covering the inner thigh and groin
At this age, machine washability matters as much as protection rating . Gear that needs hand washing and air drying gets skipped. Gear that gets skipped protects nobody.
Budget-Conscious Beginners
Getting from zero cut protection to real protection doesn't mean buying a full system. You just need to know where blades travel most.
Spend in this order:
- Neck guard first (BNQ-certified, even A3–A4 — far safer than no protection at all)
- Cut-resistant wrist sleeves second (A3–A5, worn over your compression shirt)
- Cut-resistant socks third (A3–A5, ankle and lower calf coverage)
This approach lets you build solid protection one piece at a time. No need to replace every gear item at once. A standard compression shirt plus these three additions covers the most common blade-contact zones for well under $100.
Heat-Sensitive Players
Targeted fabric placement is the answer here. High-cut-resistance fibers — Kevlar, Dyneema, UHMWPE — belong at the neck, wrists, and ankles. That's it. The chest, back, and upper arms can use lightweight polyester mesh. Protection stays where it counts, and the rest of the shirt breathes.
Look for shirts with mapped mesh panels at the underarms and mid-back. Stay away from designs that run dense cut-resistant fabric across the full torso. That extra weight and heat adds nothing useful — and it's usually what makes players leave the shirt sitting in their bag.
FAQ: Common Questions About Cut-Resistant Hockey Base Layers
Players ask these questions all the time — and the answers are far more specific than most online sources let on.
Can a regular compression shirt substitute for a cut-resistant base layer?
No. And the gap between the two is significant.
A standard hockey compression shirt — 80–90% polyester plus 10–20% spandex — sits at the very bottom of the ANSI scale. Often below A1. Some don't earn a rating at all. Cut load in real lab conditions: under 500g. A sharpened skate blade can exceed that in a single contact.
Cut-resistant base layers use a different class of fiber chemistry — UHMWPE, Kevlar, Dyneema, aramid blends. These fibers don't just absorb force. They deflect the blade edge through hardness and controlled slip. Under EN 388 testing, a UHMWPE-blend knit delivers 5–10 times the cut resistance of standard polyester at the same fabric thickness.
The injury record backs this up. Swedish and Canadian youth league investigations reviewed multiple neck, wrist, and lower-leg laceration cases. In each case, the injured player wore a standard compression layer or plain cotton socks — not cut-resistant gear. That pattern is not random.
Layering regular shirts doesn't fix this. Three layers of ordinary knit cotton improve cut resistance by 50–120%. A single A5–A7 cut-resistant base layer beats that stack by a factor of five or more. Plus, stacked layers compress under blade pressure. That compression reduces effective thickness and kills the fiber slip that makes cut-resistant fabric work. League medical reports show deep lacerations through two or three layered regular socks — documented cases, not edge scenarios.
Does washing degrade the cut protection over time?
Yes — but the drop is slow and manageable with the right care routine.
Cut-resistant fiber base layer hockey apparel suppliers have run independent tests. 25–50 machine wash cycles at 40°C with neutral detergent cause an ISO 13997 cut grade drop of one level or less — from F to E, or no change at all. Strength loss in that range: 0–15% .
The numbers shift fast above 60°C. High-temperature cycles, chlorine bleach, and hot tumble drying all speed up fiber fatigue and thermal shrinkage. In extreme cases, mechanical strength loss can reach 20–30% . For UHMWPE and HPPE fibers, heat above 80–90°C causes permanent molecular damage. The crystalline fiber structure breaks down. No amount of careful washing after that point recovers it.
Practical care guidelines for most cut-resistant hockey brands:
1.Wash temperature: 30–40°C maximum. Never above 60°C.
2.Detergent: Mild or lightly alkaline. No chlorine bleach. No fabric softener — softener residue coats the fibers and cuts the structural friction that makes cut-resistant fabric work.
3.Machine settings: Gentle cycle. Low spin speed. High-speed spin stretches the knit structure and creates weak points in the fabric.
4.Drying: Air dry flat, or tumble dry on low heat below 60°C outlet temperature. No steam cabinets, no ironing.
Replacement timeline: After 80–120 total wash cycles — about 2–3 seasons at two washes per week — treat the garment as entering its performance decline window. Replace sooner if you spot pilling, visible thinning, distorted knit structure, or any contact with harsh cleaning chemicals. For youth players and defensive players in high-contact programs, most team protocols call for replacement every 1–2 seasons, no matter how the gear looks visually.
Should cut-resistant base layers be worn year-round, or only on the ice?
The answer depends on what your feet are doing.
On the ice: Every session, every season. February playoffs or a July development camp — skate blades don't change. Ankle and lower-leg lacerations happen during on-ice contact — falls, crease collisions, board battles. The risk doesn't disappear in summer.
Off the ice: Cut-resistant protection gives you no real benefit during dryland training or gym work. The fabric isn't built for it either. UHMWPE and aramid fibers run heavier and less breathable than pure polyester compression fabric. In a non-air-conditioned training facility during summer conditioning, a full cut-resistant base layer adds heat load with zero added protection.
Most team programs land on the same approach: cut-resistant base layer — or at minimum, cut-resistant socks and a neck guard — every time skates go on. Standard compression gear for everything else.
For youth players on a tight budget, the minimum on-ice setup is cut-resistant socks plus a BNQ-certified neck guard. Add the full base layer as budget allows. That combination protects the ankle, Achilles, and carotid arteries — the three zones responsible for the majority of serious hockey laceration injuries.
Conclusion
Here's the truth about cut-resistant base layers: adequate protection and genuine protection are not the same thing. The gap between them is the gap between a close call and a serious injury.
We've covered a lot of ground — HPPE and Dyneema fabrics, the A3-to-A9 rating spectrum, and side-by-side product comparisons. One thing stands out from all of it. Your base layer isn't just another piece of gear. It's the last line of defense between a skate blade and your skin.
Most recreational and competitive players will be well-served by the CCM A6 or Titan BattleGear 2.0. Both cover what you need at that level. Youth players, though, deserve nothing less than the Duzter A5 system. Still skating in a standard compression shirt? Change that now — not next season.
Check out purpose-built hockey base layer protection options at berunclothes.com . The best game you'll ever play is a safe one.