Most brands don' T lose money at production — they lose it during sampling. A misunderstood brief, a skipped approval stage, or mixing up a fit sample with a pre-production sample can derail your entire activewear launch before a single unit ships. The apparel sampling process isn't complicated, but it is sequential. Every stage exists for a reason.
Developing your first sportswear line? Or checking out a new sports clothing manufacturer? Either way, knowing the difference between a prototype, fit, salesman, and pre-production sample gives you a sharper eye for quality and a tighter grip on timelines. You also walk into negotiations with more leverage. What follows breaks down all four garment sample development stages — direct, practical, and free of fluff.
Prototype vs Fit vs Salesman vs Pre-Production: Side-by-Side Comparison
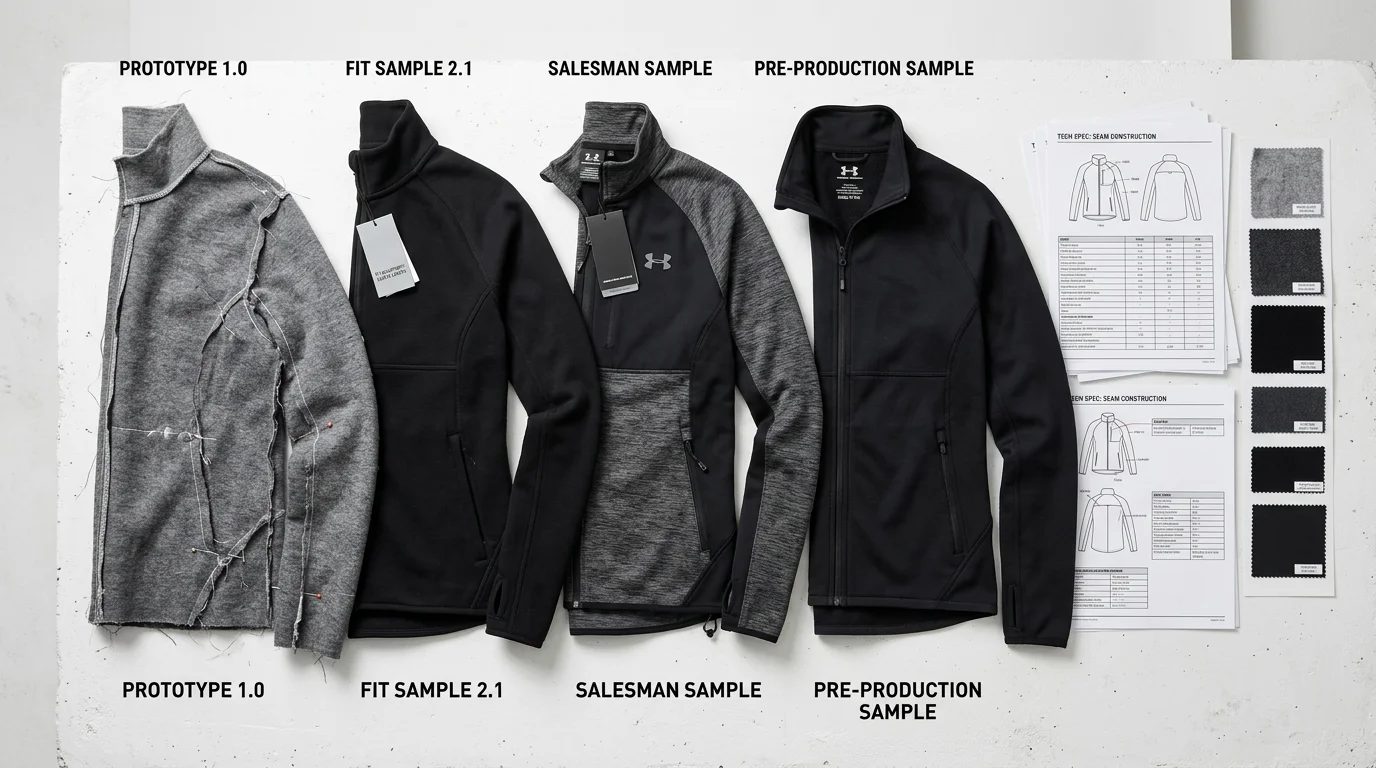
Four sample types. One production pipeline. The differences aren't just about names — they decide whether your activewear line launches on schedule or burns budget through endless revisions.
Here's the clearest breakdown you'll find.
The Core Comparison Table
Prototype | Fit Sample | Salesman Sample | Pre-Production (PPS) | |
|---|---|---|---|---|
Primary Purpose | Validate silhouette, structure, design feasibility | Lock down sizing, balance, comfort, range of motion | Sales presentations, trade shows, buyer reviews | Confirm final production "recipe" before bulk |
Development Stage | Early — concept validation | After prototype gets initial approval | After fit is stable and market exposure is needed | Final step before bulk order |
Materials Used | Substitute fabrics acceptable (similar drape/stretch) | As close to final fabric as possible | Final fabrics and trims — full brand detail | Must be final fabric, trims, and processes |
Primary Audience | Internal: design, pattern, development team | Internal: pattern makers, technical team | External: buyers, wholesale agents, showrooms | Internal: production, QC, factory floor |
Key Output | Revision list + initial pattern direction | "Fit approved" spec sheet (POM) | Buyer order feedback + style confirmation | PPS master sample + production work instructions |
What Each Sample Costs You
Most brands are caught off guard here. Sample costs aren't flat. They scale with complexity, material requirements, and quantity needed.
Prototype sits at the lowest cost tier. You use substitute fabrics, simplified construction, and small pattern rooms. Plan to spend 1 . 0–1.5× your eventual unit cost. That's low in dollar terms, but the real investment is in pattern development and technical hours.
Fit samples cost more. Add a size set — S, M, and l at minimum — plus multiple fitting rounds and technical revisions. Total fit sample spend can reach 1.5–3× your prototype investment for that one style.
Salesman samples are the most expensive per unit. You use final fabrics, final trims, and full brand details — logo labels, precise pressing, sometimes retail packaging. Multiply that across every colorway and every size your sales team needs. You're looking at 2–5× your final unit cost per piece . The small-batch penalty is real.
Pre-production samples flip the math. They're built on actual production lines with production materials. So the per-unit cost drops to 1.2–2× bulk cost — the closest any sample gets to your real landed price. The cost isn't in each piece. It's in starting up the production line, running full inspections, and producing the documentation that controls your entire bulk run.
Brands That Skip Stages — And What It Costs Them
Skipping samples isn't always reckless. Sometimes it's a calculated trade-off. But you need to know what you're giving up.
Skipping the prototype → going straight to fit: No one has confirmed the pattern direction yet. Structural problems show up mid-fit. That multiplies revision rounds and burns time you never budgeted for.
Skipping the fit sample: Size complaints and returns start here. Brands with experience — those building technical activewear with compression panels or articulated knees — never skip the fit stage on new constructions. The cost of returns and re-orders makes it impossible to justify.
Skipping the salesman sample: For DTC brands running digital-first launches, this is the most reasonable skip. Your buyers aren't handling physical samples before ordering anyway. A clean fit sample with professional photography can do the job. For activewear wholesale and multi-region distribution, skipping it hurts buyer confidence and makes order volumes unpredictable.
Skipping PPS → using a fit or salesman sample as bulk reference: This leads to batch consistency problems. Individual pieces may look fine. Across 500 or 1,000 units, you'll see measurement drift, construction variation, and quality gaps. Your QC process has no PPS baseline to compare against — so issues slip through.
The Decision Framework by Brand Scale
Early-stage or small-batch brands (sub-200 unit runs, limited capital):
- Practical path: Prototype → combined Fit/PPS → small production run
- What you can skip: standalone salesman sample, full size set
- Where to put your budget: prototype quality + one solid fit round on your hero SKU
Scaling brands with wholesale or multi-channel distribution:
- Standard path: Prototype → Fit → Salesman → PPS → Bulk
- Salesman sample quantities run 4–20 pieces per colorway for multi-region sales teams
- Sample investment represents 5–15% of total annual style cost — and that's the number protecting your bulk margin
The sample stage you want to cut is almost always the one that would have saved you the most money.
The Complete Sportswear Sampling Process: From Concept to Bulk Approval
Nine checkpoints stand between your design concept and a bulk activewear shipment. The brands that move fastest know what happens at each one.
Here's the full sequence. Use it to plan real timelines and real budgets.
The 9-Stage Sampling Pipeline
Stage 1 — Tech Pack Finalization (Weeks 1–3)
Everything starts here. Your tech pack is the one document that drives every decision after it. Flat sketches, BOM, measurement charts, construction notes, logo placement, stitch requirements — all of it locked before the first sample gets cut. An incomplete tech pack doesn't just slow things down. It stacks up revision rounds at every stage that follows.
Stage 2 — Fabric and Trim Confirmation (Weeks 4–5)
Digital swatches don't cut it. You need physical material approval before sampling begins. Need custom-woven or custom-dyed fabric? Add waiting time — sometimes a lot of it. Lock your materials at this stage. Delays here pile up fast later on.
Stage 3 — Prototype Sample (Weeks 6–9)
The factory cuts and builds the first physical version of your garment. Structural logic, silhouette, construction feasibility — that's what's under review. Your design, pattern, and technical team signs off. The pattern needs correction? It goes back for revision before anything moves forward.
Stage 4 — Fit Sample Rounds (Weeks 10–14)
Most brands underestimate this stage. Standard styles need 2–3 fit rounds . Complex technical activewear — compression panels, articulated knees, bonded seams — can push that to 5–7 rounds . Each round takes 1–2 weeks .
Every round checks key measurements against your approved spec sheet: chest, waist, hip, shoulder width, sleeve length, garment length. Fit models, pattern makers, and brand product managers review together. Verbal feedback isn't enough. Teams mark deviations on the sample and document everything in writing before moving forward.
Stage 5 — Salesman Sample (If Required, 1 Round)
One production run, final materials, full brand detail. Built for trade shows, buyer presentations, and marketing shoots. This stage is about visual commercial readiness — not production standards. DTC-first brands can often skip it. For wholesale with regional sales teams, this is the stage that builds order confidence.
Stage 6 — Pre-Production Sample Approval (Week 15+)
The PPS is the last gate before bulk. It must match final fabrics, trims, sizing, labels, and processes on all points. The brand's technical lead signs off in writing before production starts. No exceptions.
Stage 7–9 — Bulk, TOP Sample, Release
Once production starts, the factory pulls a Top of Production (TOP) sample from the first batch. It confirms that what the factory is making matches the approved PPS. Spot any drift — on measurements, construction, or materials — and production stops for correction.
What Controls Your Timeline
Three variables cause most delays:
Tech Pack completeness — more gaps mean more back-and-forth
Material confirmation speed — physical approval is the standard, not digital
Style complexity — zippers, splicing, functional pockets, bonding, and specialty stitching all add time to both sampling and pattern revision
Total timeline from tech pack to bulk approval runs 10–25 weeks . The sampling and fit approval window alone — the stage most brands underplan — takes 2–4 weeks at minimum under ideal conditions. Overseas sampling can stretch a single round to 4–8 weeks .
Plan for the realistic case, not the optimistic one.
Common Mistakes Brands Make During the Sportswear Sampling Stage
Here's a hard truth: most activewear launches don't fail at the factory. They fail in the weeks before bulk — silently, at real cost, and almost always for the same handful of reasons.
Brands can work through the full sampling pipeline and still fall into these traps. Knowing the stages isn't enough. You have to know where the process breaks down — and why.
Mistake 1: Rushing Past Fit Sampling to Get to Salesman Samples
This is the most expensive shortcut in sportswear development. A brand gets one prototype, loves the look, and pushes straight to salesman samples or bulk — before grading has ever been tested on real bodies.
The result? Mediums fit great. Your XS runs tight through the thigh. Your XL gaps at the armhole by 2 cm. Returns climb past 20–30% on activewear bottoms. Now you're spending unbudgeted money to fix a problem you never caught.
The industry standard is a minimum of two sample rounds before approving any style for production. That means one prototype round and at least one dedicated fit round — not one sample trying to do both jobs at once.
Before signing off on a fit sample and moving to salesman, check every critical measurement against your spec sheet. Chest, waist, hip, body length, sleeve length, rise — all of them need to land within ±0.5–1.0 cm for core sizes. Run your grading across at least three size points (S, M, XL) using real fit models that match your target customer.
Write down specific feedback: tight at the thigh, gaping at the armhole, waistband rolls under. Vague feedback creates a second problem on top of the first. "Doesn't feel right" sends the factory in the wrong direction. Exact notes get exact fixes.
Fit and grading both need sign-off before salesman samples get ordered. No exceptions.
Mistake 2: Treating Salesman Samples as Pre-Production References
Salesman samples are built for buyers and showrooms — not factory floors. Factories produce them early, sometimes in substitute fabrics or alternate color lots, to hit sales deadlines. That's expected. The mistake is what comes next: brands use that same salesman sample as the reference for bulk production.
Here's what that costs you:
Color deviation. Bulk runs on a different dye lot. Without a PPS approved on actual bulk fabric, you get a visible shade difference versus your line sheet. Markdowns follow.
Fabric substitution. A salesman sample built on 180 gsm fabric doesn't show what 220 gsm will do in movement. Stretch percentages shift. Recovery shifts. See-through risk shifts too.
Trim inconsistency. Zippers, elastic quality, reflective tape, logo techniques — lock all of these at PPS stage. Don't assume they carry over from a salesman sample.
The fix is straightforward: classify your samples and enforce that classification in writing.
Fit sample — for pattern and grading approval only; test fabric is acceptable.
Salesman sample — for sales and visuals; temporary substitutes are permitted.
Pre-production sample — 100% identical to bulk in fabric code, color lot, trim code, and construction. No exceptions.
Add this line to your tech pack: "Salesman sample NOT for production reference. PPS only." Track every approval in a version-controlled document so nothing gets assumed or lost.
Mistake 3: Approving PPS on Feel Instead of Facts
This one is subtle. The sample arrives, the team gathers, everyone agrees it looks great — and approval goes through. Nobody measured it. Nobody checked the seams under pressure. Nobody washed it three times to test shrinkage.
That's approval based on gut feel. It's how bulk quality problems get a green light.
A PPS approval isn't a vibe check. It's a technical audit. Run it like one.
Here's the checklist every sportswear PPS review should cover:
Full measurement audit — Measure every critical point against your spec sheet. Set tolerances: ±0.5 cm for chest and waist, ±1.0 cm for length. Any measurement outside tolerance goes back before bulk starts.
Construction and trim check — Inspect seams, hems, and stitching at high-stress zones: crotch, armhole, side seams. Confirm logo technique, placement, care labels, and reflective elements against your approved BOM.
Functional fit test — Sit in it, stretch in it, raise your arms. For leggings and sports bras, assess pull, ride-up, and gaping under actual movement.
Wash test — Wash the PPS 3–5 times at recommended care conditions. Measure shrinkage. The acceptable benchmark for sports knit is ≤3–5% in length and width. Anything beyond that needs a pattern or fabric adjustment.
Change documentation — Write down every correction with a photo. Update the tech pack. Get written confirmation from the factory. Verbal agreements don't make it to the production floor.
Don't approve a PPS just to skip one more round. Key risks that remain at PPS stage cost far more to fix once bulk is running.
Mistake 4: Skipping Functional Performance Tests at the Sample Stage
A sample can look flawless and still let your customer down after three workouts. This is the sportswear-specific risk that brands underestimate most — and it has the most visible consequences.
Activewear specialists say it plainly: fabrics don't perform as expected because brands skip testing before bulk production. The tests that catch these problems aren't complicated. They just don't happen.
Make these functional tests mandatory on every PPS:
Pilling resistance — For high-friction zones like thighs and underarms, target a minimum rating of 4 out of 5 on a Martindale abrasion scale after 5,000–10,000 rub cycles. Skip this and premium leggings surface-fuzz after two wears.
Color fastness — Sweat, wash, and light fastness should reach at least Grade 4 for major sports markets. Skipping this test leads to logo fade and color bleeding onto other garments post-workout.
Stretch and recovery — Measure stretch percentage and recovery after wear and wash cycles. Fabric that grows more than 5–8% in length or width produces baggy knees and a waistband that drops mid-run.
Moisture management — Compare wicking time and drying speed against a benchmark fabric. "Quick-dry" is a performance claim. It needs data behind it.
Build this into your PPS process: Have target users wear each style through 2–4 full workouts before signing off. Wash the sample 3–5 times. Check for pilling, shrinkage, color transfer, and fit changes after each cycle. Approve the sample only after it performs the way the product promises it will.
Four More Mistakes That Kill Activewear Quality Without Warning
These don't each need their own section — but all of them belong on your radar:
Expecting production after one sample round. The industry benchmark is two rounds minimum. One round misses too much.
Making major design or fabric changes late in sampling. Late pivots bring in new errors and reset the clock. Scope creep at the sample stage is a timeline killer.
Vague feedback to your factory. "Make it more premium" gets you nothing. "Increase waistband height by 2 cm, switch to 260 gsm fabric, change seam to flatlock" gets you results.
Switching factories mid-sampling. Experienced brands need no more than two prototypes before committing. Changing activewear suppliers mid-process resets the pattern, resets the relationship, and adds weeks that weren't in the plan.
The sampling stage is where your activewear line gets built right — or gets set up to fail. Every mistake above is preventable. Not with more budget, but with a tighter process.
FAQ: Sportswear Sampling Costs, Timelines, and Quantities Answered
Real numbers cut through confusion fast. Here are the answers brands ask most — what sampling costs, how long each stage takes, and how many pieces you need.
How much does a sportswear sample cost?
It depends on complexity. Simple knit tops and T-shirts run US$30–60 per piece at factories in China or Bangladesh. Complex compression leggings or multi-panel sports bras push that to US$60–120+ per piece. That higher cost covers pattern work, grading, and fit testing.
Here's a cost breakdown for a women's high-waist legging prototype:
Pattern fee: US$80
Sample sewing: US$60
Print/logo transfers: US$25
International courier: US$35
Total: ~US$200 per style
That same legging at 500-unit bulk production runs around US$11.50 per unit. Your proto cost sits at about 17× your bulk cost. That ratio is normal. Complex compression pieces can hit 10–20× .
One more thing: many professional factories deduct the sample fee from your bulk invoice once your order reaches a minimum threshold — 300–500 pieces per style is the standard cutoff. Ask about this upfront before you pay.
How many samples do you need?
Prototype: 1–2 pieces, in one base size and one colorway
Fit sample / size set: 3–5 pieces minimum (XS–L). Compression styles or sports bras often need 5–7 sizes — tight fit tolerances demand it
Salesman samples: scales with your distribution. DTC brands need 2–6 pieces per style . Regional sportswear wholesale programs need 10–30 pieces . Global rollouts can require 50–150 pieces
Testing and content samples: add another 4–8 pieces per style for QC lab testing, photography, and influencer seeding
Most sportswear startups end up with 5–12 total samples per style before bulk ships.
How long does each stage take?
Sample Stage | Standard Lead Time | Rush Option |
|---|---|---|
Prototype | 7–21 days | 3–7 days (+20–50% surcharge) |
Fit sample / size set | 14–28 days | Varies by complexity |
Salesman samples | 25–45 days | Synced with production line when possible |
Sublimation prints, bonded seams, or laser cuts push prototype timelines to 20–30 days . Specialty material sourcing is the main reason. Rush sampling is available at most sportswear factories. Expect a surcharge of +20–50% or a flat US$50–100 per style to move up the queue.
What's the smartest way to send a sample request?
Send a complete tech pack. That means:
CAD sketches with panel and seam detail
A measurement chart for at least one base size — cover sport-critical points: chest, waist, hip, thigh, inseam, rise
Fabric specs listing fiber content, gsm, knit type, and stretch percentage
A full trims list
State your sample type clearly: "Round 1: 2 proto samples, women's legging, size S. Round 2: size set XS–XL after fit approval." Vague requests create extra rounds — and extra costs.
Also ask for itemized invoicing — pattern fee, sewing fee, print setup, courier listed separately. Confirm in writing whether sample charges are deductible against bulk. That one conversation saves real money.
Conclusion
Every successful sportswear line starts long before bulk production. It starts with the right sampling strategy.
Knowing the difference between a prototype, fit sample, salesman sample, and pre-production sample is more than industry jargon. It's a clear roadmap. Brands that understand each stage launch with direction. Those that skip or confuse the steps burn budgets on endless revisions and missed deadlines. Each stage has its own demands — knowing them helps you communicate better with sportswear manufacturers, make sharper decisions, and move faster.
The apparel sampling process doesn't have to be complicated. But skipping steps always makes it harder.
Ready to move from concept to confirmed bulk order? BerunClothes works with brands at every stage of sportswear development — no guesswork, no wasted rounds. Get your samples done right the first time.
Start your sample request today — because the brands that win don't wait.